

27 Jun Laying laminate
To lay a laminate floor, it is necessary that the place where you are going to lay it is perfectly flat. Laminate flooring can be laid on top of a concrete screed or on top of an old wood floor as long as it is sufficiently level. If the floor surface is uneven, then first you need to lay plywood with a thickness of at least 18 mm..in any case, you will need a substrate under the laminate panels. The substrate is necessary for moisture, noise and thermal insulation. And also to compensate for the unevenness of the floor on which the laminate is laid.
Types of substrates for laminate panels
The substrate is made of foamed polystyrene, it is cheaper, but over time it loses its properties somewhat, as the floor is crushed under pressure. Here are its characteristics –
Sound insulation =17 dB, Density = 32 kgm.k, Thermal conductivity = 0.03 W (mk)
More expensive, but high-quality extruded polystyrene substrate. She resists pressure very well. Here are its characteristics – Sound insulation from impacts = up to 7%, Density = 34 kgm.to , Thermal conductivity = 0.1 (mk).
An expensive Finnish underlay, consisting of two layers of polyethylene, with polystyrene granules between them, is able to remove excess moisture from under the laminate floor, from its ends. Its characteristics are close to those of a cork substrate.
And finally, the best, and therefore the most expensive, natural cork backing. Here are its characteristics – Sound absorption = 17 dB, thermal conductivity = 0.04 W (mk). It does not cake at all, and is not afraid of high temperatures, which allows it to be used for the manufacture of underfloor heating.
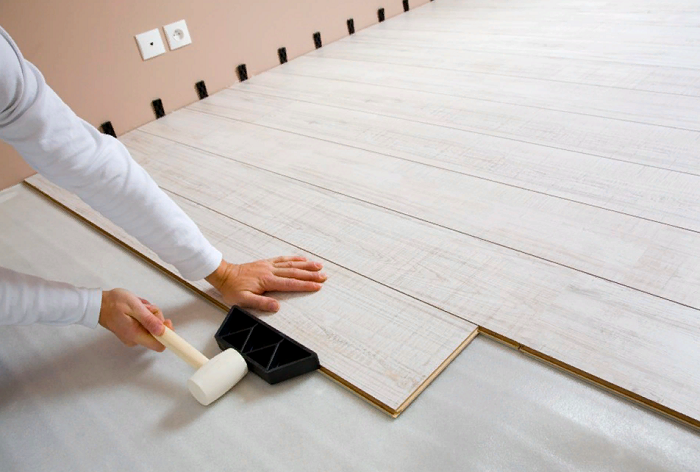
Laying laminate
A concrete floor has the ability to absorb moisture from the atmosphere and release it to everything it comes into contact with. Therefore, it is first necessary to put a vapor barrier material on it, and then a substrate. After the floor is leveled, the substrate is laid, we accurately measure the number of rows that need to be laid. We look, if the last row is not obtained from solid panels and is less than their half width, then we just make the first row of such a width. This is because the narrow last row will be difficult to install. Now from the ends we fix all the whole panels of the laminate together. Why we start the end of one panel to a suitable locking connection, the end of the other panel at an angle of 45 degrees, insert it tightly and gently press from above. If the panels are difficult to insert, we knock them out quietly with a rubber mallet. If you still have a distance to the wall, then turn the last panel upside down so that the end locking part (which you will then insert into the last whole panel) rests against the wall. Make a mark with a pencil at the junction, and turning it back, draw a line with a square. Then saw off along the line with a fine-toothed hacksaw. If there is a miter box, then it is better to do it in it. After the first row is laid out, insert small technological wedges about 1 cm thick between it and the wall.. They are needed so that the laminate floor does not come into contact with the walls in the future, since being based on wood, it can rear or warp over time due to changes in humidity. Subsequent rows must be laid with the panels offset relative to each other by at least one third of the panel length. This is done to ensure that the connection of the panels to each other was rigid and durable. Thus, we lay the entire floor. We take out the wedges, and glue the plinth on liquid nails, but not to the floor, but to the wall, since the floor is a floating structure that needs some space so that it does not swell when the humidity changes. The substrate also lies unglued under the floor, only pressed down by the weight of the floor itself.
Finished laminate floor.
No Comments